
AMP Track Guide
AMP is absolutely awesome. It’s a truly unique and extremely technical track. The massive elevation and camber create huge variations in grip through almost every corner. Most of the course is so technical that only a few corners have different lines based on each car’s power-to-grip ratio. The FIA progressive curbing is wonderful for safely giving a driver feedback on how accurately they’re placing the car across the full range of aggression levels; whether they’re being nice to the car and only using a few inches of it, or going all-out qualifying laps and using as much of the curbing as the car can handle.
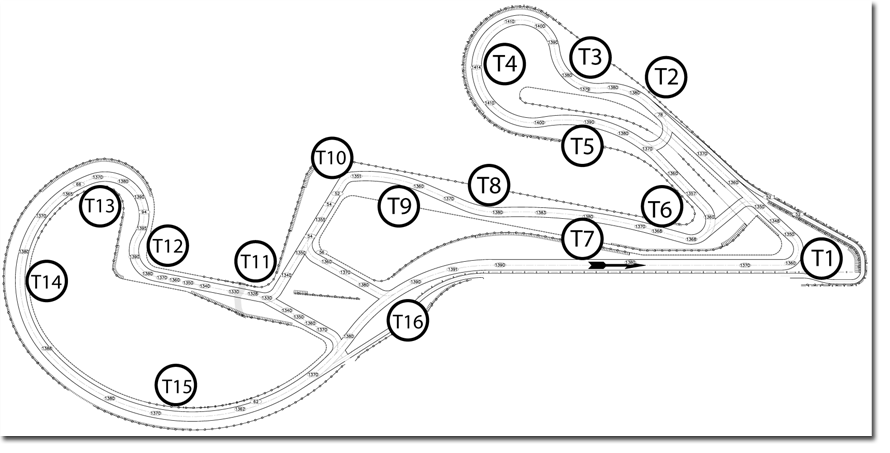
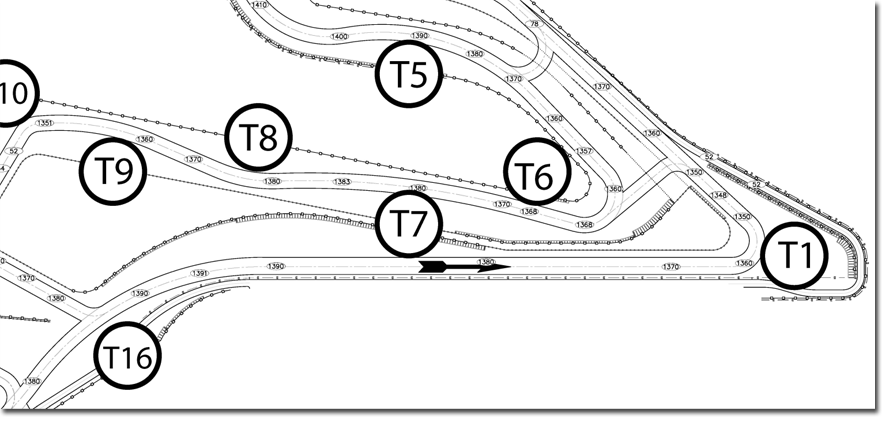
Leaving the pits – AMP has an excellent pit-out arrangement that, while VERY tight, has great sight lines and allows the cars leaving the pits to get fully up to speed before merging. Technically, cars leaving the pits can actually be going faster at the merge point than a similar speed car coming out of Turn 1. It really makes for an easy and safe merge when coming out of the pits onto a hot racetrack.
Side Straight – Heading toward the T2-T3 esses and the carousel T4. Turns T2, T3, and T4 are fully linked; more of a set of esses into a carousel than individual corners. On the side straight you will move the car all the way to the right to setup for the left T2. You can actually see your first apex of T4 before turning in for T2. That T4 first apex is actually your “target” for T2 and T3. You will be carrying as much speed through T2 and T3 as possible and gather it up into T4. The main thought you should have as you come into the T2-T3-T4 complex is carrying enough speed into the esses so that you are continually scrubbing the speed down all the way to that first apex of T4. You want to focus on the T4 first apex and carry speed all the way to it.
T2 – The slight left beginning the left-right-left T2-T3-T4 complex. In most cars you will at least turn the car left while still at full throttle, in some cars you may even get past the T2 apex before braking. All cars should carry enough speed through T2 and T3 to need the uphill sweep between T3 and T4 to finish their braking. Your lowest speed for the T2-T3-T4 complex will be near that first apex of T4. Now that you understand how to mentally work your way from T4 back to how you should enter T2, we’ll start again with entry to T2. It’s our first almost blind, hard-to define turn-in point. After the track-out curbing of T1 ends the pit out road merges with the track. Assuming there is not a car exiting the pits right next to you, you’ll move all the way to the right. The turn-in for T2 is almost exactly where you can first see the apex curbing of T2. I’m not sure if AMP will add some turn-in curbing there when they extend some of the other curbing, but right now it’s best to use the sight-picture of being all the way right and just being able to see the leading edge of the T2 apex curbing. Most cars can easily turn-in at full throttle. All cars should be apexing through the middle of the left-side T2 apex curbing. Most cars will be pulling the car left while starting to brake, getting the wheel straight for a moment of straight-line threshold braking before easing up on the brakes (not all the way off, just off enough to turn) and bending the car to the right to make the T3 Apex.
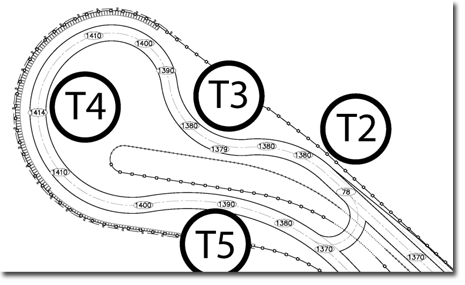 T3 – The right between the T2 and T4 lefts. You should be looking through T3 while you’re still pulling the car to the left before your straight-line threshold braking between T2 and T3. You’ll ease up on the brakes as you bend the car hard right across the apex through the middle of the right-side T3 curbing. You’ll be on that right-side curbing for a little over a car length before bringing the car back to the left into T4. These combo corners at the end of a straightaway really take the load off of the brakes and teach a driver how to scrub speed while cornering. The hill between T3 and T4 catches the car and helps get the final slowing done into the carousel T4.
T4 – The big long double-apex carousel that really helps when tuning the balance of a car. This can be used as a skidpad on each lap which is quite nice for developing a car or parts. This is also the only flat corner on the whole track. T4 is fully linked to T5 which exits onto a very short straight. Therefore, you must consider the entire sector from the middle of T4 through the exit of T5 while breaking down the lap. The vast majority of cars will use at least a car length of apex curbing on the way into T4 before letting the car go a bit wide in the middle of T4 to setup for the exit. Even a stock Miata should have a bit of a “deepspot” where you are wide of the apex and preparing to turn back in for the second apex. This is one of the few places where throttle application and second apex of T4 are very different depending on each cars power to grip ratio. Most cars will want to make their second apex well after the T4 left-side apex curbing ends. Regardless, pick an apex release point, use it, and then begin moving it around once you know how much speed it will let you carry through T5.
T5 – The big right heading down to the hairpin T6. Lower powered cars will have been full throttle since the deepspot of T4, higher powered cars will still be rolling into the throttle as they come across the T5 apex. Most cars will be getting onto the right side T5 apex curbing slightly before the middle and staying on for 3 or 4 car lengths before releasing and heading toward the T6 turn-in. Nearly all cars will be making an almost straight line from their T5 apex release to the T6 braking point. The way the track drops away after T5 and comes back up hard into T6 prevents a full track-out before braking for T6.
T6 – The complex hairpin in the middle of the track. This is an interesting corner. The braking zone and turn-in section are uphill and on-camber with a lot of grip. Right now the curbing is unpainted and very high grip. AMP says that they are going to paint it, so it might change, but for now you definitely want to be on the curbing for the end of the braking and turn-in. You can really drive it in there and get the car slowed and turned before the apex. Then there is a sharp but not visually obvious crest right at the apex. You must get most of your turning done early because the grip goes away dramatically past the apex. The crest of the corner almost tosses the back of the car on the way off of the corner so be ready for oversteer. You’ll use a lot of the apex curbing and you can use the track-out curbing as well.
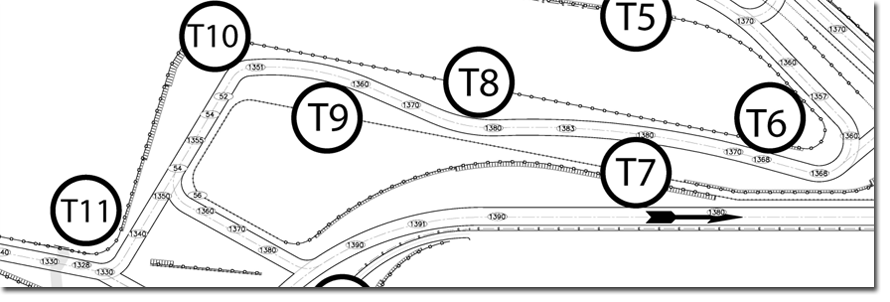
T7 – The slight left bend. It’s not really a corner; you’ll use the curbing on the left to know when to turn in for T8. All cars should be all the way left on at least the beginning of the curbing and most cars should go ahead and turn right for T8 before the middle of the T7 curbing.
T8 – The slight right downhill bend before T9. When you turn right for T8 correctly there is a very smooth line from turn-in for T8 to the braking point through T9. Make your “smooth but decisive” turn-in to the right and then hold your line. The right-side T8 apex curbing just comes to you and you run over it on the way to the braking through T9 and turn-in for T10 at the end of the right side curbing.
T9 – The official AMP track map shows T9 as the slight bend to the left before the near 90 degree T10. T9 is basically the braking zone for T10.
T10 – The awesome, larger than it looks, nicely compromised, on-camber valleying (opposite of cresting) entry with an off-camber and downhill exit, near 90 degree left. Again, at least for now, the curbing has a lot of grip so you’ll want to get out onto the right-side T9/10 turn-in curbing for the end of your braking and turn-in. If you’re all the way wide right for turn-in and use a lot of apex curbing on the left, this is a bigger corner than it initially appears. The turn-in almost feels early, but you can still be back on the power before the apex. The vast majority of cars will not use the track-out curbing from T10. You’ll need to be pulling the car back to the left to setup for T11.
T-11 – The valley corner before the bridge. As blind and lacking grip as the cresting corners are, this valley corner has great visibility and massive grip. Again, using all of the curbing makes this corner much bigger than it initially appears. Keep raising your speed until you’re working the car from turn-in to track-out. Some cars do not handle the apex curbing very well. The massive download from the valley uses up a lot of the suspension travel, adding the bump of the curb is enough to hit the bumpstops in some cars. Experiment with using all of the T11 apex curbing and then try using only an inch of it. If the curbing unsettles the car enough to force you to reduce mid-corner speed or delay throttle application try using less, or even none of the curbing. Back to entering T11; you’ll be pulling the car back to the left as you leave T10. Be certain to get all the way to, if not onto, the left-side turn-in curbing. You’ll turn-in well before the end of the turn-in curbing. This is definitely one of those corners that really reward getting your eyes up and looking through the corner as early as possible. At least try using most of the apex curbing, right through the middle of it and see how your car puts up with it. You should be able to go to full throttle quite early as the continued rising of the pavement loads grip into to the car. Enjoy a moment of straightaway before the sharply peaked T12.
T12 – The top of the mountain. If you get a chance, look at the AMP track map with the elevation drawn on it. The top of T12 is literally a sharp mountain peak. Physics still apply. On the way up the hill be sure to stay all the way left on the turn-in curbing. Even the low power cars will have to brake at the top. Realize that as the braking zone ends, from that point on the grip will be reducing until you land on the other side of the crest. Make a smooth but decisive turn-in, use all of the right-side T12 apex curbing and keep pulling the car to the right for a car length or two after leaving that right-side apex curbing. At that point you will still be off of the throttle, and then bring the car back to the left toward the left-side apex of T13.
T13 – The downhill left that begins the curviest “straightaway” in the world. After pinching the exit of T12 to get some setup into T13, you’ll be hitting the left-side T13 apex curbing approximately two car lengths from the end of the curbing as you add throttle. Most cars will track-out well after the right-side T13 track-out curbing has ended. The T13, T14 and T15 set of lefts are all about gaining speed everywhere you can.
T14 – Normal cars have fairly consistent amount of grip. With a consistent amount of grip, vehicle speed defines the radius it can turn on. Therefore, you should have to be unwinding the wheel, increasing the radius, as speeds rise. You want to be accelerating on this “straight” but you don’t want to unwind the wheel faster than the track unwinds. Fortunately T15 will go uphill, giving more grip and allowing a bit of tightening of the line so you can track out T14 at least some if not well out before the hill of T15 lets you turn it back in a bit. It’s also bumpy on the inside of T14 so there is more grip further out on the track.
T15 – Is the uphill finish of the long left sweeper. Technically you entirely compromise the exit of T15 so that you can make the right T16 as wide as possible. At the end of T15 you will be ALL the way left, nearly using the cut-through road for turn-in for T16.
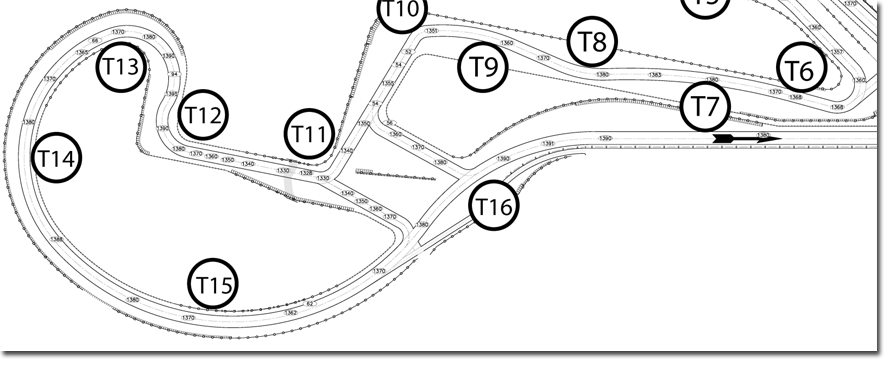
T16 – The high-speed cresting right onto the front straight. A good turn-in at the access road on the left, apexing for the first few car lengths of pit wall and unwinding smoothly to track-out makes this an easy corner to take at full throttle in a lower power car. In a higher power car you’ll need to breathe carefully off the throttle to get the car to turn toward the apex and you’ll have to play with throttle reapplication and release from the apex carefully on the way from the peak of the crest at the apex toward the downhill and off-camber track-out. There is good track-out curbing over there, but you don’t want to need too much of it. You’ll only have a moment of true straightaway to check your gauges before the braking zone into T1.
T1 – The tight, downhill half corkscrew left. AMP will be putting proper brake marker boards on the way to T1, for now they’re carefully setting the 4, 3, 2, 1 cones. This braking zone progressively falls away, so make sure that you understand that your ability to slow reduces as you get closer to the corner. Despite that warning, this corner also has good grip and comes back up at track-out so you can put more speed through it than initially expected. It’s another one to really focus on getting your eyes up to track-out as soon as possible. Again you’ll want to be all the way out to the right on the turn-in curbing, look over your apex to your track-out as soon as you can. Use a lot of the apex curbing as the right side of your car is unweighted and the track is falling away. Get your eyes up to track-out as soon as possible and start adding throttle. The track comes up and almost on-camber at track-out which allows a lot of throttle application for the run back toward T2-T3-T4.
A note on the curbing – defining the edge of a racetrack is a bit of a challenge. The more track you use the faster you can go. Turn-in and track-out have the loaded pair of tires at the edge of the track so drivers don’t want to put any more tire any further off of the pavement than what’s fastest. Apex curbing is totally different. The apex side of the car is unweighted so if those tires are in the grass, or the air, or even over mild bumps it doesn’t slow the car. There are many corners at many tracks where the fast line has almost the entire car off the track and only the outside tires still on the pavement. Progressive curbing helps define the edge of the track. The curbing needs to be unsettling enough that it’s not faster to use all of it. The nice thing about the progressive curbing is that if you want to be “nice” to your car you can just use a few inches of it. If you are feeling more aggressive you can go faster with more curbing up to a point. The curbing progresses to a point where a driver will need to place the car accurately to use the appropriate amount of curbing.